The Best Fluffy Pancakes recipe you will fall in love with. Full of tips and tricks to help you make the best pancakes.

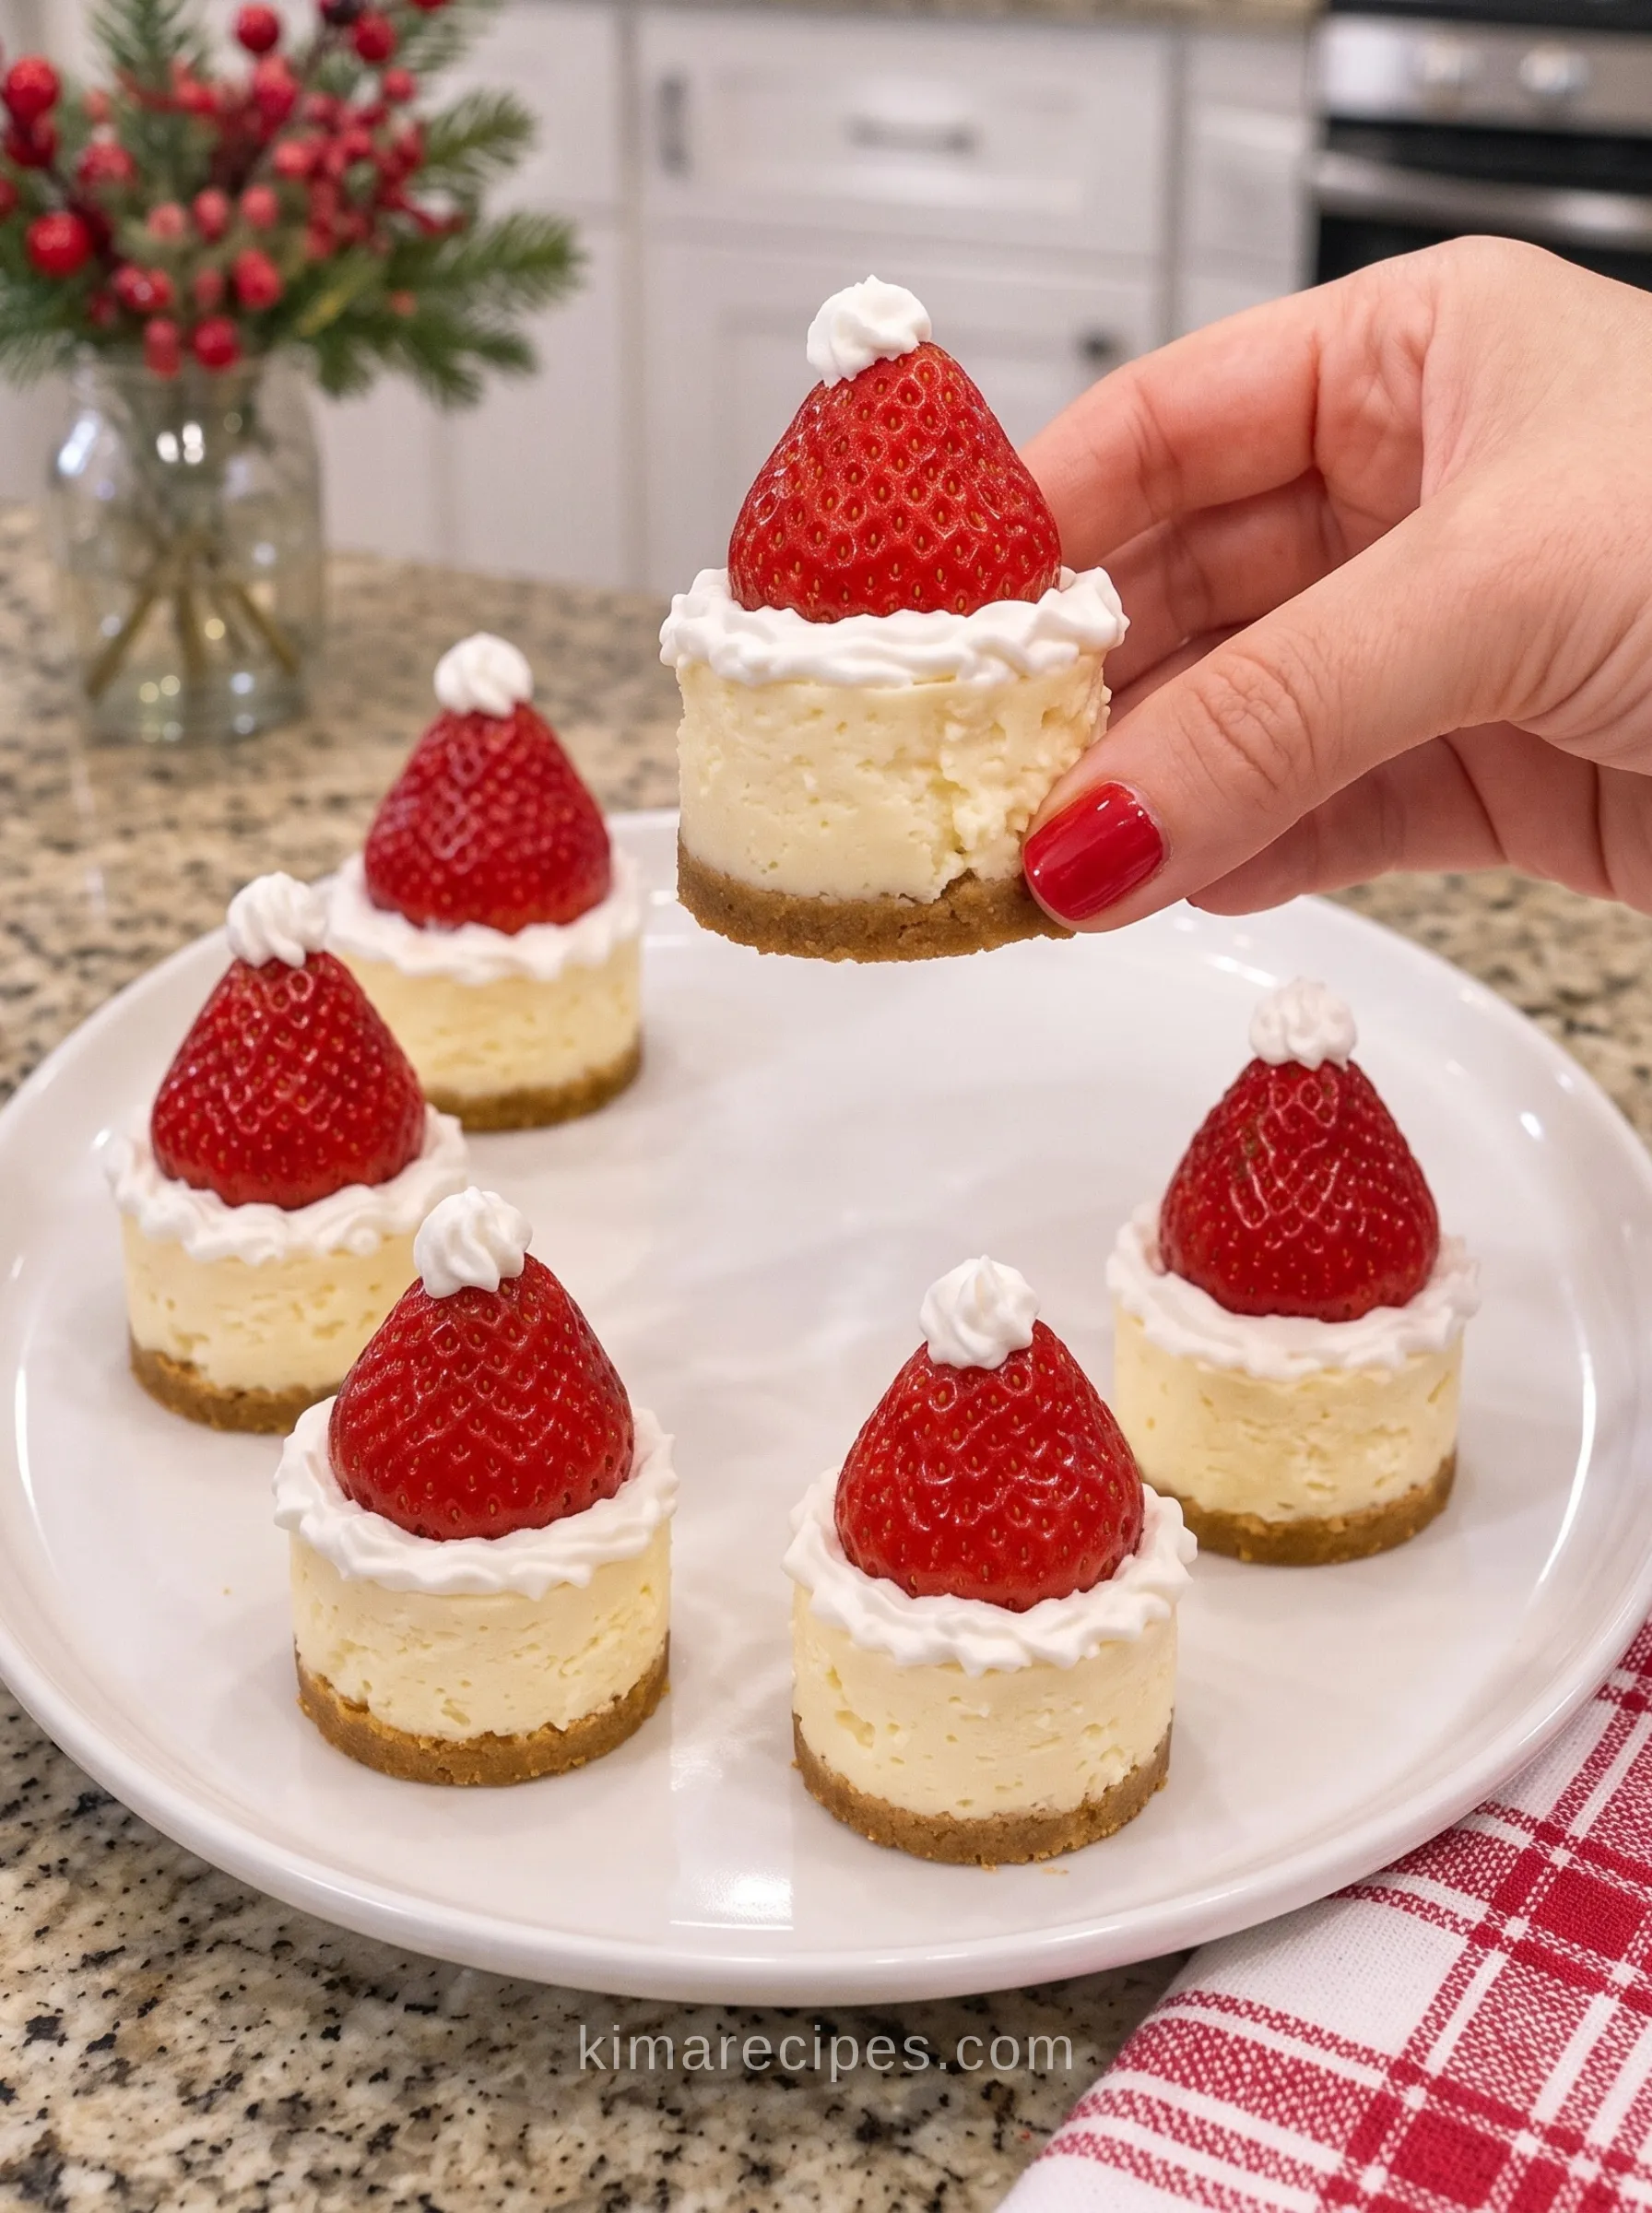
My first tray of these looked great for about twenty minutes. Then the hats started to lean.
One by one, the strawberries slid off their little rings of cream. By the time my family got to dessert, it looked like a row of very tired Santas.
The problem was water. I’d rinsed the berries and given them one lazy pat with a towel. That was it.
So these Santa Hat Cheesecake Bites come with that lesson built in. Nothing goes in the oven. You get:
- a buttery graham cracker crust
- a no-bake cheesecake filling, lightened with whipped cream
- a strawberry hat with a white pom-pom on top
All you need is a mini muffin pan, a piping bag, and some room in the fridge.
This is what I bring when someone says “just bring something small.” They’re small, sure. But they’re still the first plate to go empty.
Quick Look
- Prep: 25 minutes
- Chill: 4 hours 15 minutes
- Makes: 18–24 bites
- Level: Easy
- The one rule: dry the strawberries completely
Why These Santa Hat Cheesecake Bites Hold Their Shape
There’s no egg and no oven here. So the only thing that sets the filling is cold fat. That changes how you handle each step.
1. The whipped cream is the structure. Whipping cold cream to stiff peaks traps air. Then the fridge firms it up. If you fold in plain liquid cream instead, the filling never sets.
But don’t go too far. Over-whipped cream turns grainy, with little flecks of butter. Stop when the peaks stand straight and the cream still looks glossy.
2. Soft cream cheese gets beaten first. Cold cream cheese leaves small lumps. And once the whipped cream goes in, you can’t beat hard anymore. You’d knock all the air out.
That means any lumps at that point stay in for good. So get it fully smooth first.
3. The lemon juice is not optional. It’s only one tablespoon. Still, I left it out once to test it. Without it, the filling tastes like frosting in a cup. The tang is what makes it taste like cheesecake.
4. The 15-minute crust chill matters. It lets the melted butter firm up and hold the crumbs together. Skip it, and the crumbs lift when you add the filling. You end up with a gritty layer in the middle of each bite.
5. A flat cut plus a cream ring works like glue. A dry, flat strawberry sits on the cream and stays put. A damp one floats on it and slides. A paper towel and a sharp knife fix the whole problem.
Ingredients
For the Graham Cracker Crust
- 1½ cups graham cracker crumbs
- ¼ cup granulated sugar
- 6 tablespoons unsalted butter, melted
For the Cheesecake Filling
- 16 oz cream cheese, softened (full-fat block, not the tub kind)
- ½ cup powdered sugar
- 1 teaspoon vanilla extract
- 1 tablespoon fresh lemon juice
- 1 cup heavy whipping cream, cold
For the Santa Hat Topping
- 18–24 fresh strawberries, medium and close in size
- 1 cup heavy whipping cream, cold
- 3 tablespoons powdered sugar
- ½ teaspoon vanilla extract
How to Make Santa Hat Cheesecake Bites
Step 1: Press the crust. Line a mini muffin pan with paper liners. Mix the graham cracker crumbs, sugar, and melted butter until it looks like wet sand.
Next, press about 1 tablespoon firmly into each liner. The back of a small measuring spoon works well. Chill for 15 minutes.
Step 2: Make the filling. Beat the soft cream cheese, powdered sugar, vanilla, and lemon juice until completely smooth. Scrape the bowl once.
In a second chilled bowl, whip the cold cream to stiff peaks. Then fold it into the cream cheese in two parts. Stop as soon as the white streaks are gone.
Step 3: Fill and chill. Spoon or pipe the filling over the chilled crusts. Fill each liner to the top, with a slight dome.
Smooth the tops with a spoon. Then chill for at least 4 hours, until firm to the touch.
Step 4: Prep the strawberries. Wash the berries. Then lay them on paper towels for 15–20 minutes, and roll them over once.
After that, pull off the green tops. Slice a thin piece off the stem end so each berry stands flat.
Step 5: Whip the topping. Beat the second cup of cold cream with the powdered sugar and vanilla. Stop at stiff peaks. Then spoon it into a piping bag with a star tip.
Step 6: Build the hats. Lift the chilled bites out of the pan. Pipe a small ring of cream on top of each one.
Next, set a strawberry on the ring, flat side down and point up. Press lightly. Finally, pipe a tiny dot of cream on the tip for the pom-pom.
Step 7: Serve. Arrange the bites on a platter. Keep them in the fridge until it’s time to eat.
Recipe Details
| Prep time | 25 minutes |
| Chill time | 4 hours 15 minutes |
| Total time | 4 hours 40 minutes |
| Servings | 18–24 bites |
| Difficulty | Easy |
One standard 24-cup mini muffin pan gives me 24 bites. I usually have a few spoonfuls of filling left over.
Tips for Perfect Santa Hat Cheesecake Bites
Dry the strawberries like you mean it. This is the big one. Water thins the cream right where the berry sits. And that’s exactly where the hat needs grip.
Pick berries by size. Look for strawberries about an inch wide at the top. The big showy ones are wider than the cheesecake. As a result, they tip over even when they’re dry.
Soften the cream cheese properly. Leave it out for a good hour. The microwave works in a pinch. However, it softens unevenly, and the edges can turn oily.
Don’t rush the chill. Four hours is the minimum. If the bite is only set on the outside, it squishes when you pipe on it. Then the strawberry sinks.
Decorate close to serving time. See the make-ahead notes below for why.
Variations
Gingersnap crust. Use gingersnap crumbs instead of graham, same amount. This is my favorite for Christmas. The spice works really well with the cool filling.
Chocolate cookie crust. Use crushed chocolate sandwich cookies, filling and all. Cut the butter to 4 tablespoons, since the cookies are already rich. Plus, the dark base makes the red hats pop.
Sturdier topping. Will the bites sit on a buffet for more than an hour? Then beat 2 oz of soft cream cheese into the topping cream before whipping. It holds its shape a lot longer.
Canned whipped cream: skip it. I tried it for the pom-poms once to save time. They melted into little puddles before I’d even finished the tray. Pipe your own.
Make-Ahead and Storage
The bases make ahead well. Fill and chill them up to a day ahead, loosely covered. In fact, they’re easier to decorate the next day because they’re fully firm.
The hats don’t. A cut strawberry slowly leaks juice into the cream below it. After a few hours, you get pink streaks and a soft, weepy base. So add the hats no more than 2–3 hours before serving.
Freezing. The plain bases freeze well for up to a month. Thaw them overnight in the fridge. Never freeze them with the strawberries on, though. Thawed berries collapse.
Leftovers. They keep in the fridge for a day. They still taste good on day two. They just don’t look like Santa hats anymore.
FAQ
Can I make Santa hat cheesecake bites the day before?
Yes, but only the cheesecake part. Make the crusts and filling the day before. Then whip the topping and add the hats on the day you serve them. The hats look their best for about 2–3 hours.
Why is my no-bake cheesecake filling runny?
Usually, the cream wasn’t whipped to stiff peaks. Soft peaks look done in the bowl. But they collapse once you fold them into the cream cheese.
Other common causes:
the cream was too warm to whip well (chill the bowl too)
you used tub cream cheese instead of the block
the bites didn’t chill long enough
Already filled and still soft after 4 hours? Give them a full night in the fridge. They usually firm up.
Do I need a mini muffin pan?
It’s the easiest way. Otherwise, use a 9×9 pan lined with parchment. Press in the crust, spread the filling on top, and chill. Then cut it into small squares and add a hat to each.
Can I use frozen strawberries?
No. They go soft and wet when they thaw, so they won’t stand up.
How long can these sit out at a party?
Two hours at most, since this is a dairy dessert. In a warm room, the cream droops sooner. I set out half the tray and keep the rest cold to swap in later.
Closing Thoughts
Taking these to someone else’s house? Don’t build the hats at home.
Instead, pack three things:
- the bases, still in the mini muffin pan, so they don’t slide around in the car
- the strawberries, already dried and trimmed, in a container
- the topping, in its piping bag, in a cooler
Then you need five minutes at the counter when you arrive. They’ll look freshly made.
One last thing: set them next to the hot cocoa. Something cold and tangy next to a hot, chocolatey mug is the best pairing on a Christmas dessert table.