The Best Fluffy Pancakes recipe you will fall in love with. Full of tips and tricks to help you make the best pancakes.

Banana pudding cups solve a problem regular banana pudding has — everyone has to dig into the same dish, and by the second day the bottom layer is soup. Cups fix that. Each one gets exactly the right ratio of pudding to wafer to banana, and the ones nobody’s touched yet stay fresh in the fridge instead of sitting out getting soggy under a spoon that’s been through six hands.
Why This Works
The sweetened condensed milk isn’t just for sweetness. It thickens the pudding past what the instant mix alone would do, which matters because these are meant to hold their shape in a cup, not slump.
Folding in half the whipped cream instead of all of it does two things. It lightens the pudding so it doesn’t sit heavy, and it leaves you with enough reserved cream to actually pipe or swirl on top. Dump it all in and you get a softer, less structured pudding with nothing left for garnish.
The lemon juice step matters more than it looks like it should. Skip it and slice your bananas more than twenty minutes before assembly, and you’ll have brown edges peeking through the pudding by the time anyone eats one.
Ingredients
For the Pudding
- 2 (3.4 oz) boxes instant vanilla pudding mix (or banana cream)
- 3 cups cold whole milk
- 1 (14 oz) can sweetened condensed milk
- 1 pinch salt
For the Whipped Cream
- 2 cups cold heavy whipping cream
- ¼ cup powdered sugar
- 1 teaspoon vanilla extract
For Layering
- 4 medium bananas, barely ripe, sliced
- 1 tablespoon lemon juice (optional, for make-ahead)
- 1 (11 oz) box mini vanilla wafers, some crushed for crumbs
Instructions
- Whisk the instant pudding mix, cold milk, and sweetened condensed milk together in a large bowl for about 2 minutes, until thickened.
- Whisk in the pinch of salt.
- Refrigerate the pudding 5 to 10 minutes while you whip the cream.
- Beat the cold heavy cream with the powdered sugar and vanilla until medium-stiff peaks form.
- Fold about half the whipped cream into the pudding until smooth and light. Reserve the rest for topping.
- If making ahead, toss the banana slices in lemon juice first.
- Layer crushed wafers into the bottom of each cup.
- Spoon in pudding, add banana slices, then a few whole wafers.
- Repeat the pudding and banana layers.
- Top with a swirl of reserved whipped cream, a sprinkle of wafer crumbs, and one whole wafer.
- Chill at least 30 minutes so the wafers soften. This part isn’t optional — straight out of the assembly the wafers are still crunchy, and that’s not the point of banana pudding.
- Serve cold.
Prep Time: 20 minutes Total Time: 50 minutes Servings: 8 cups
Tips
- Use bananas that are barely ripe — bright yellow, no spots. They hold their shape under the pudding’s weight and brown slower than a spotty, fully-ripe banana would.
- Stop whipping the cream at medium-stiff peaks. Past that and it starts separating into something closer to butter, which won’t fold into the pudding cleanly.
- Don’t assemble more than 24 hours ahead if you want the wafer layers to still have some texture left. Past that window everything’s uniformly soft.
Variations
Banana cream pudding mix instead of vanilla pushes the banana flavor further, and honestly it’s the better call if bananas are the point. Skip chocolate pudding mix here though — I tried it once and the flavor fights the bananas instead of complementing them, muddy rather than rich.
Chopped pecans between layers add crunch that survives the chill better than the wafers do, if you want something with texture on day two.
Make-Ahead
Assemble up to 24 hours ahead. Best within the first 12 — the wafers keep some bite and the bananas haven’t started going gray at the edges yet. Past 24 hours the texture flattens out; everything’s still edible, just softer than it should be. Don’t freeze these. The pudding separates and the bananas turn to mush on thaw, no way around it.
FAQ
Can I make banana pudding cups the night before? Yes — assemble up to 24 hours ahead, but for the best texture, do it the morning of or the night before at the latest.
Why is my pudding runny? Usually one of two things: the milk wasn’t cold enough, or the pudding didn’t get its full refrigeration time before you started layering. Instant pudding needs cold liquid to set properly — room temp milk will leave you with something closer to a thick drink than a pudding.
Do I need to use whole milk? Whole milk gives the pudding the fullest texture. Lower-fat milk works in a pinch but the pudding comes out thinner.
Can I use fresh whipped cream instead of Cool Whip? That’s what this recipe calls for, and it’s worth the extra step — fresh whipped cream folds in lighter and tastes less artificial than tub whipped topping. If you’re short on time, Cool Whip will hold up fine in the layers, just skip it for the swirl on top since it doesn’t pipe as cleanly.
How long do banana pudding cups last in the fridge? Covered and refrigerated, 2 to 3 days. The wafers keep softening the whole time, so day one and day three are noticeably different textures.
Closing Thoughts
If you’re bringing dessert somewhere and don’t want to deal with slicing and serving on-site, this is the format that solves it. Nobody has to wait for a slice; everyone just grabs a cup.
About Kima
I’m Kima, and I test everything on this site in my own kitchen before it goes up — no-bake desserts like this one are where I spend most of my time, because they’re the ones people actually make on a weeknight.
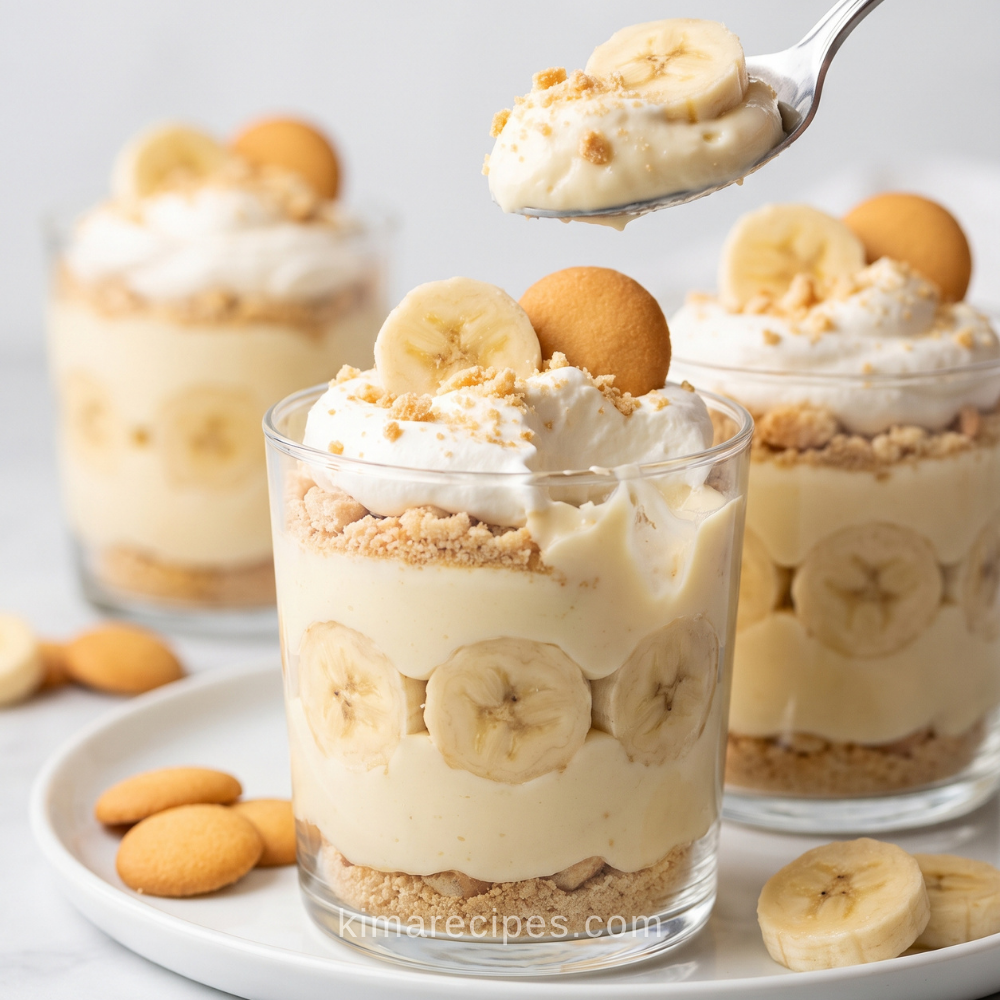
Banana Pudding Cups
These individual banana pudding cups feature layers of creamy vanilla pudding, fresh banana slices, mini vanilla wafers, and homemade whipped cream. They are an easy make-ahead dessert perfect for parties, holidays, and family gatherings.
Ingredients
Equipment
Method
Prepare the Pudding
- Add the instant pudding mix, cold whole milk, and sweetened condensed milk to a large mixing bowl.
- Whisk for about 2 minutes, or until the pudding mixture is smooth and beginning to thicken.
- Whisk in a pinch of salt.
- Refrigerate the pudding for 5–10 minutes while you prepare the whipped cream.
Make the Whipped Cream
- Add the cold heavy whipping cream, powdered sugar, and vanilla extract to a separate mixing bowl.
- Beat with an electric mixer until medium-stiff peaks form. Do not overwhip.
- Fold approximately half of the whipped cream into the chilled pudding with a rubber spatula until smooth and light. Reserve the remaining whipped cream for topping the cups.
Prepare the Bananas and Wafers
- If preparing the dessert in advance, gently toss the banana slices with the lemon juice to help prevent browning.
- Set aside several whole mini vanilla wafers for layering and garnishing. Crush the remaining wafers into coarse crumbs.
Assemble the Pudding Cups
- Divide a layer of crushed vanilla wafers evenly among the bottoms of 8 dessert cups.
- Spoon a layer of pudding over the wafer crumbs.
- Add a layer of sliced bananas and a few whole mini vanilla wafers.
- Repeat with another layer of pudding and banana slices, dividing the ingredients evenly among the cups.
- Top each cup with a swirl or spoonful of the reserved whipped cream.
- Garnish each cup with vanilla wafer crumbs and one whole mini vanilla wafer.
Chill and Serve
- Refrigerate the assembled pudding cups for at least 30 minutes so the dessert becomes cold and the wafers soften slightly.
- Serve the banana pudding cups cold.
Notes
- Choose barely ripe bananas: Use bright yellow bananas without dark spots so the slices hold their shape and brown more slowly.
- Do not overwhip the cream: Stop mixing when medium-stiff peaks form so the whipped cream remains smooth and easy to fold into the pudding.
- Make ahead: The cups may be assembled up to 24 hours in advance, although their texture and appearance are best within the first 12 hours.
- Prevent browning: Toss the banana slices lightly with lemon juice when preparing the cups ahead of time.
- Storage: Cover the cups and refrigerate them for 2–3 days.
- Freezing: Freezing is not recommended because the bananas and pudding may develop an undesirable texture after thawing.